Showing posts with label silver sparkle card stock. Show all posts

Saturday, November 17, 2018

MFT GIVEAWAY | Video Tutorial

Hi Friends!  I recently posted a new video on my Youtube Channel showcasing the new Christmas Tree Window die-namics from  My Favorite Things.  The exciting part of the video is that I am also sharing that the video is sponsored by MFT and they are helping me giveaway a $25.00 gift certificate to their shop.  All you need to do is be a subscriber of my channel and also their channel, and leave a comment on the video!


All the details of the giveaway is over at the video description box, so be sure to head there for your chance to enter!!  I also share how quickly this card came together with very few supplies, and it showcases this window die beautifully with the silver sparkle card stock, which is one of my favorites!!


I also use one of the sentiments from the Beautiful Blessings sentiment set also new this month on this inside of the card.  

Thank you all for stopping by and be sure to get entered!  Thank you again MFT for having me as a guest this month and also sponsoring a video on my channel!!  I am truly honored!!

Kari


Tuesday, November 13, 2018

MFT and Friends Guest Designer

Hi all!!  Today is an exciting one on my blog and for me personally as a cardmaker!  I have the pleasure and honor of being a Guest Designer for My Favorite Things this month!!  Today is release day for the November 2018 release, and it is a awesome one - like they all are!  I am happy to be among these talented designers, and play with these awesome products!


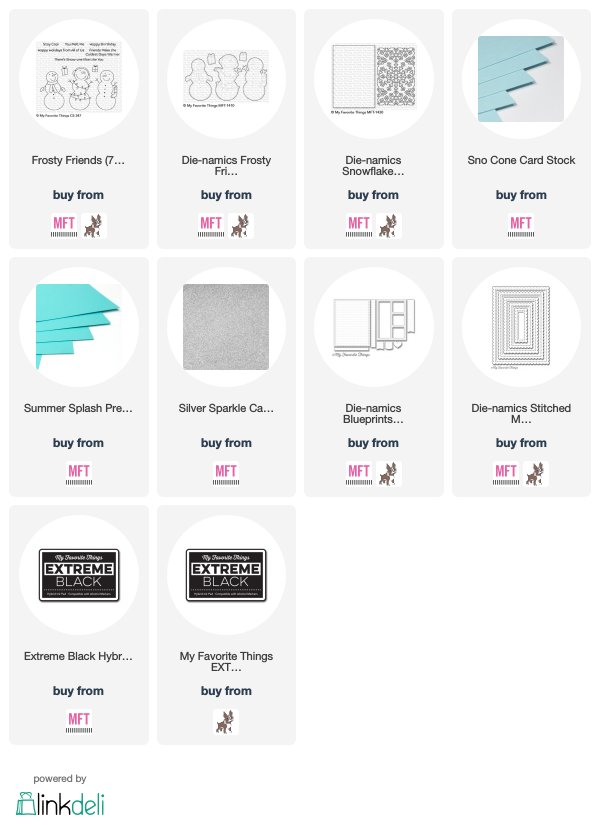
For my card today, I am using the new stamp set Frosty Friends, and the Snowflake Window Die.  I started out by die cutting my pieces that I would be using on my card, and the Snowflake Window is die cut from some Sno Cone Card Stock.  I also die cut a piece of Silver Sparkle card stock from one of the Stitched Mini Scallop Rectangle dies, and a piece of white card stock using the largest scalloped rectangle from the Blueprints 27 die set.  The banner piece also comes from Blueprints 27!  Such a all around versatile die set!  I set those pieces aside as well as my Summer Splash card base, and I worked on my snowman.  I like images this as they are super easy to add color!

I stamped my snowman in Extreme Black ink, and used my Copic Markers to add a bit of color.  I used BG10 to add some shadow around the left side of his body and blended it out with my Colorless Blender. I used YR09 and YR18 for his nose, RV17 and RV19 for his scarf and gloves, R20 for a little rosy cheek and a small amount of C2 around the scarf where it lays on his body to create a bit of shadow.


I assembled all of my elements together with liquid adhesive and added foam adhesive to add dimension to my snowman.  For my sentiment, I stamped it using the same black extreme ink, and adhered it to my card with foam adhesive as well.  To finish my card off, I used my white gel pen, and added some white polka dots to my snowman's scarf for a bit of interest!  

I love these images so much, so whimsical and fun!!  Thank you so much to My Favorite Things for having me this month as a guest designer!  Truly an honor!  Stay tuned, as I will be partnering with MFT for a giveaway on my YouTube Channel!

For now - be sure to head over to MFT and check out the entire November Release!!


Saturday, July 8, 2017

Combining Distress Inks with Distress Oxide

Hi friends!
Today I wanted share how I used both Distress Inks and Distress Oxide inks together!  It was a layering day as my inks were layered, my stencils, and my die cuts - HAHA!
I started out by using a piece of Ready Cut Strathmore watercolor paper, and used the direct to paper technique with my Squeezed Lemonade Distress Ink cube, and covered the entire piece of watercolor paper.  Then, I took out my Fill In Floral Stencils from Concord and 9th, and used the Wild Honey Distress Oxide ink and applied the first layer of flowers.  Then, to add detail to the flowers, I used the second stencil with Twisted Citron Distress Ink.  Very bright, very summer appropriate!
I did the same thing with the blue card which was Salty Ocean Distress Ink, and Oxide ink with the Twisted Citron Distress Ink.  The only stamping I did was the stamping of my sub sentiment from the Crafty Friends stamp set from Altenew.  I also wanted to add a little sparkle and shine, so I die cut both the Scripty Hugs and Scripty Thanks dies from Lawn Fawn from Silver Sparkle card stock from MFT and layered it onto of a white die cut.
Love how they both turned out!  I never get tired of playing with these inks, and you will see more from me in the next coming weeks for sure!!  Have a great rest of the weekend!!

Kari


Saturday, February 25, 2017

Rainbow Sentiment Die Cut Background | No Stamping | MFT

Hi My friends!  Today I am sharing a card featuring all die cuts and creating a background using the "Hello" die from My Favorite Things as well as their 6x6 paper pad called Roses All Over.  I thought it would be fun and different to create a card using all die cuts as a background.  And, I love this new 6x6 paper pad!

Who doesn't love a rainbow themed card?!  I love anything rainbow...makes me happy.
I started my die cutting a piece of smooth white card stock from one of my favorite dies from Right At Home, and I took several pieces of the Roses All Over paper and created 10 hello die cuts, 10 to be exact.

I adhered them down with a glue pen and rotated each one for a fun pattern!  Once I had them all adhered, I took the same frame die from RAH, and ran my focal panel through my die cut machine to complete the stitched edge and to also help flatten all the die cuts to my white card stock piece.


For my additional sentiment, I die cut a piece of silver sparkle card stock using the Friend Script die from Mama Elephant, and adhered it to a black pierced dot detail banner die cut, and popped it up with some foam adhesive to some dimension.


For all the supplies used, I have them listed below as well as the video tutorial!  Thank you all for stopping by today!! See you soon!

Kari


Saturday, February 11, 2017

Valentine's Day Shaker Card | Zig Clean Color Markers | Neat & Tangled


Hi Friends~

Today I wanted to share with you this shaker card featuring Neat and Tangled's stamp set Favorite Little Nut.  This is an adorable set and perfect for Valentine's Day.  You could also use this set all year long too!!  

I love these illustrations by Elena Roussakis!  She's got such a fun and sweet style to her images and love the fonts also that she creates with her sentiments!

For my squirrel I decided to color with my Zig Clean Color Real Brush Markers.  These are great to achieve a fast water color look to your images!

 I also stamped several times one of the acorn images, and created my own shaker bits to add inside the window, along with some die cut hearts.  My red panel is a piece of Pure Poppy card stock from PaperTrey Ink.  This red is one of my favorites!  I die cut my card stock with a stitched rectangle die from Mama Elephant and created my window using MFT's Peek a boo window die.


I added two layers of foam adhesive to ensure my shaker elements would move around well.  Before putting together my shaker card, on the front of the focal panel, I stamped my sentiment from the same Neat and Tangled set, You Are My Favorite!

Once I was happy with how that stamped, I put my shaker card all together.  I wanted to add a bit more silver into my card to tie in my shaker bits, so I die cut a piece of MFT silver sparkle card stock with one of my Hero Arts Infinity Dies.  Love this set!!  So handy to have!

For the inside, I stamped another sentiment from the same set, I am nuts for you, which I felt appropriate for my shaker theme.


Thank you all for stopping by today, and I hope you have a wonderful Valentine's Day with your loved ones and friends!


Saturday, December 24, 2016

Holiday Card Series 2016 | BONUS VIDEO | Right At Home Shop


Merry Christmas EVE!  Today I wanted to bring all of you a BONUS video in my Holiday Card Series.  I wanted to show you how to make these fun, quick and easy tags for those last minute gifts!

I am using the Folded Tag Die set from Right at Home Shop.  This set has a lot of elements including the tag holder, sentiments, scalloped border and more!


I used Lawn Fawn's Perfectly Plaid Christmas 6x6 for my pattern papers, and the awesome thing is the main die fits perfectly on a full 6x6 sheet!  

You could do a multitude of things with these tags including using the holder as a gift card holder! 


All the supplies as well as the bonus video is below!!  I wish you all a very Merry Christmas and a Happy 2017!